Beginner's Guide To Making Kimchi
By Alex C
Senior Food Writer at Pro Home Cooks
When someone says kimchi, you automatically think of bright red, sour and spicy napa cabbage but in actuality you can really “kimchi” anything. In fact, there are over 200 different kinds of kimchi in Korea and limitless ways of making them unique to your taste buds. Instead of thinking of kimchi as a side dish you eat at your favorite Korean restaurant, think of kimchi as a verb. It’s really a process of preserving vegetables by fermenting them in a very flavorful sauce. Before modern refrigeration became a thing, the fermentation method of choice for Koreans was the act of making kimchi because it was a way to preserve vegetables for long periods of time thus ensuring a stable food supply throughout the winter. Centuries later, making kimchi is now rooted in Korean culture. It’s even a way of showing love and passing down a Korean family's heritage. You won't see a Korean kitchen without a jar of kimchi and now since it became popular in recent years, you’ll even start to see jars of kimchi in non-korean kitchens such as mine!

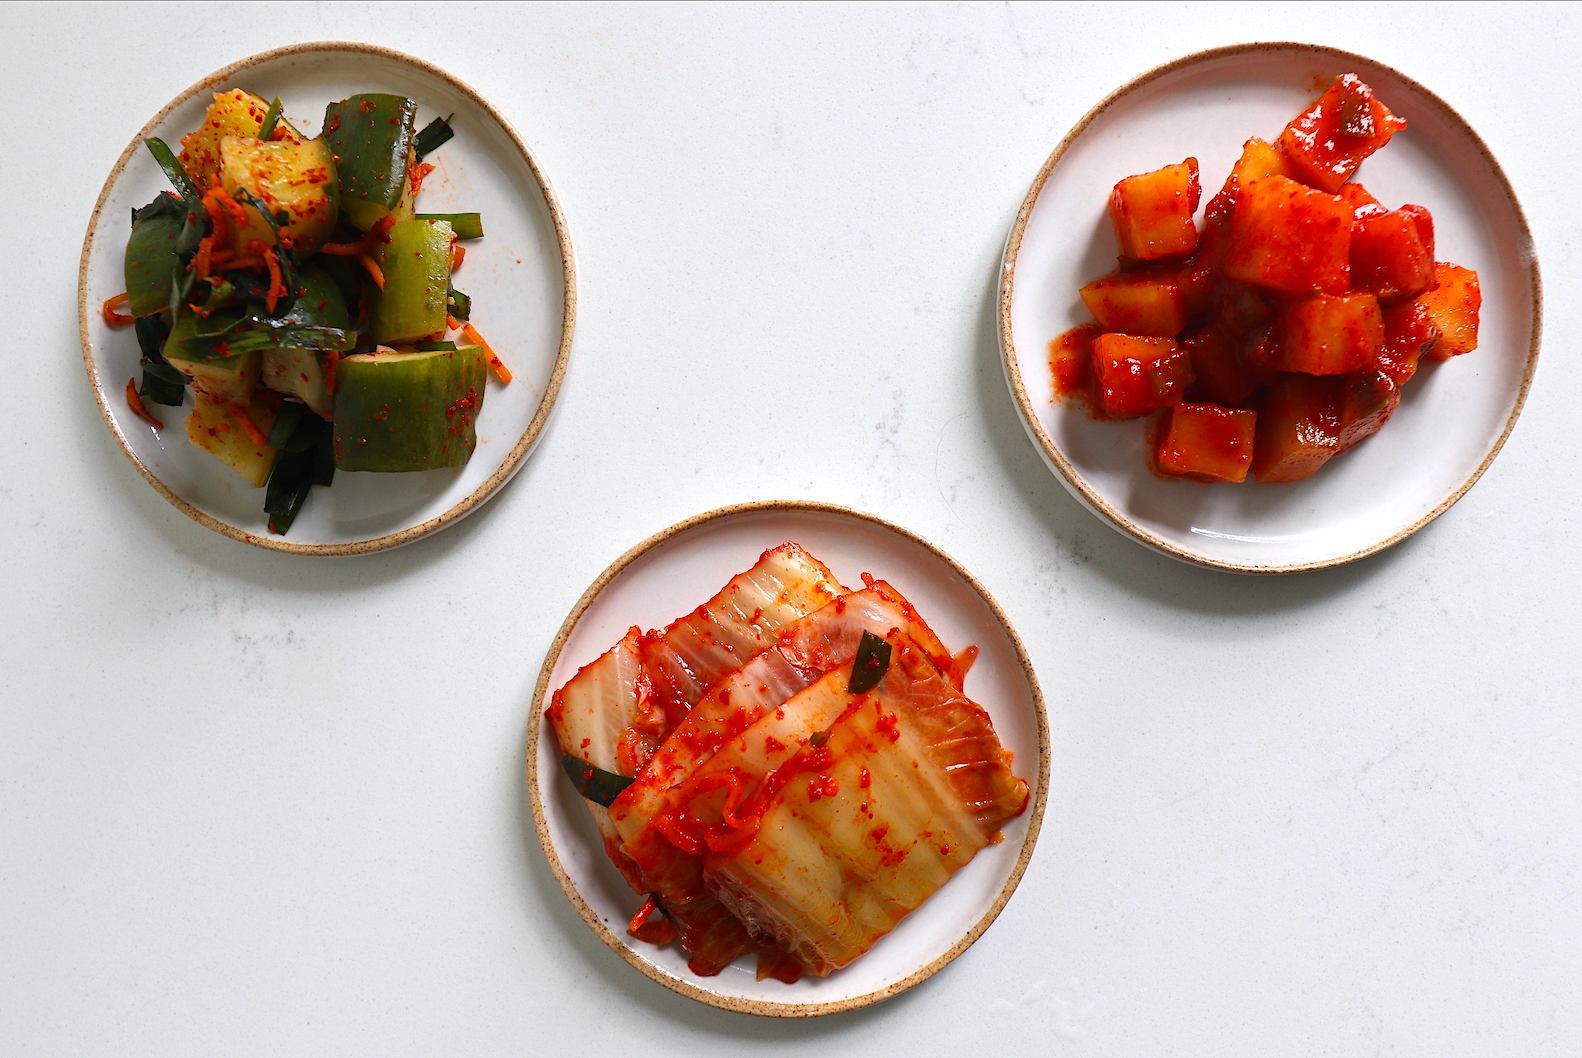
There are numerous types of kimchi, ranging from classic napa cabbage kimchi to green onion kimchi. They can be bright almost neon red in color or as white as snow. They can be sour/tangy, sweet, spicy, a little fizzy from the fermentation but they are always a total bomb of umami deliciousness. These variations of kimchi allow for people to enjoy different tastes and textures throughout the year and because kimchi is a fermented product it is constantly changing. From the moment you make it to the last bite of the batch, the flavor and texture will develop over time. A fresh batch of kimchi will be better suited as a side with rice and pork while an older batch of kimchi will be much more suited for a bubbling cauldron of kimchi jjigae (a spicy kimchi soup).It is such a dynamic dish that changes over time but what does not change throughout the fermentation process is the bountiful health benefits kimchi has. It is naturally rich in vitamins, fiber, and probiotics and really great for your gut health.

Despite the many different kinds of kimchi you can make there are still three main parts of the process that all kimchi can be broken down into: prepping, saucing, and fermenting. The main vegetable, which can be but is not limited to napa cabbage, radish, scallion, cucumbers, or chives, is rinsed of any dirt or debris. Next, comes brining. Not all kimchi will need to be brined. Scallion, chive, and dandelion kimchi are all types that don't need to be brine. (You can brine them but it isn't necessary.) However, for cabbage kimchi and radish kimchi they need to be brined to help draw out as much water as possible. By heavily salting it, the moisture will come out so you aren't left with a watered down kimchi. The second reason you’d brine your veggies is that it will soften the veggies, making the more delicate vegetables (like cabbage) less prone to breakage. Brining the veggies will take anywhere from 30 minutes to 2 hours depending on how large the vegetable is. For example, cubed radish will only take 30-40 minutes where a whole head of cabbage will take 2 hours.

While the vegetables are brining, it is a good time to start step 2 of the kimchi making process: saucing. In this blog post I will only be talking about the typical red kimchi paste. (However, there are different kinds.) There are two key elements to the paste: chopped veggies and the sauce itself. The actual sauce can be as simple as mixing gochugaru flakes, fish sauce, and honey to something even more complex by adding onions, garlic, ginger, sugar, and fermented shrimps. But just know that the base of the seasoning paste is what gives the kimchi its flavor. The veggies will ferment in this delicious potent paste and it is one part of what makes the kimchi flavor so complex.

My personal sauce mixture is a puree of onion, garlic, ginger, and a fruit such as an apple or asian pear mixed with fish sauce and gochugaru flakes. I find that this is the perfect base for me and my family but you can totally customize it to how you like it. For example, some people omit the fish sauce to make it vegan. You substitute equal parts of soy sauce and miso paste for the fish sauce. Some like to add in salted fermented shrimp or shrimp paste for an extra umami layer. I love the entire fruit but some just add fruit juice or fruit extract. Fermented plum juice is a popular choice if you can find it in stores!

Once the sauce has been made, you can move on to your chopped veggies. For the chopped veggies, you can totally omit them entirely but I love adding chives, carrots, and or scallions. These are the classic three in my book. They add an extra layer of flavor and crunch and I love finding a little radish or scallion in the mix. However, I’ve also heard of other people adding pine nuts, perilla leaves, and bean sprouts. The chopped veggies are totally optional but I never make a batch of kimchi without adding extra veggies. Add any chopped veggies you want to the sauce and mix until everything is combined. This is the final seasoning paste.

Depending on your preference, you can make a rice paste. It is not part of the kimchi sauce and some people completely omit it. It’s simply sweet rice flour cooked in water until you have a slightly gloopy mixture that coats the back of a spoon but is still pourable. The rice paste is combined with the seasoning paste to help coat and bind the seasoning to the veggies. It helps the sauce adhere to the veggies. I find it helps when making a traditional batch of napa cabbage kimchi.

One might think that the rice paste is the driving force fermenting the veggies but this isn't true. The rice flour doesn't directly contribute to the fermentation because the kimchi will only be fermenting for three to four days which does not give the rice enough time to ferment. However, it does indirectly support the fermentation process by enhancing the flavor profile of the kimchi by ensuring that every nook and cranny of that veggie is well and evenly coated in spices and seasonings.

After the veggies are completely and evenly coated by the paste, it is ready to begin the final step of the process: fermentation. Place the kimchi into a clean and dry fermenting vessel. This can be a traditional onggi, an airtight plastic container, or a glass jar. Really any vessel that limits the exposure to oxygen is what you're looking for. When packing the veggies, make sure to get as much air out as you can so no bacteria can grow. You can top with a few fermentation weights if you have any and then seal the jar with its lid.

Depending on the vessel you are using, you will open the jar/container to allow the gas to release, push the veggies down a bit with clean hands or clean utensils to make sure everything is covered in its own brine and check for any signs of mold forming. If you are using an onggi, you don't need to release any gas but it is a good habit to check the water line and any signs of mold forming. During fermentation, the flavors develop, and the vegetables soften while retaining their crisp texture. After 3 days, the kimchi should be perfectly fermented, so give it a taste and it should be ready to be stored in the fridge. If you want a kimchi with more sour punch, you can leave it to ferment longer. The max amount I would recommend would be 5-7 days depending on the kimchi you are making.

Properly fermented kimchi, will be spicy (anywhere from mild to hot), umami packed, slightly sweet, and tangy/sour due to it being fermented. You can eat kimchi the day it's made but to really enjoy its enhanced flavors you have to let it ferment in its own brine. However, a fun fact about kimchi is that it doesn't need to be fermented. Some kimchi is made and eaten on the same day. One example of this is stuffed cucumber kimchi (recipe below). You can ferment it if you'd like but stuffed cucumber kimchi is one that is delicious the day of because of the crispy fresh cucumber. Another example of kimchi being eaten on the same day it is made is a fresh batch of napa cabbage kimchi! When people are making large batches of cabbage kimchi, a nice treat to have for dinner is boiled pork belly with fresh kimchi!. It wont be tangy since its not fermented but it will still be delicious!

Making kimchi can sometimes be labeled as an arduous process but in reality once you understand the process its pretty easy and for the outcome to be delicious homemade custom tailored kimchi, I recommend everyone should make at least one batch of kimchi!
Traditional Napa Cabbage Kimchi
Ingredients:
- 1 large Napa cabbage
- ¼ cup of Salt
- 1 cup of Water
- 2 tablespoons of sweet rice flour
- 1 small Korean radish
- 1 Carrot
- 7-8 stalks green onions
- 6-7 stems of chinese chives
- ¼ cup Fish sauce
- 2 tablespoons of salted shrimp (can be replaced with an equal amount of fish sauce
- 4-5 cloves of garlic
- 1 small knob Ginger
- ½ Korean Pear
- ½ an onion
- 1 cup gochugaru aka red pepper flakes

Instructions:
- Make a slit about 5 inches deep at the root of the napa cabbage and using your hands rip it to divide the cabbages into halves (see photo above). Next, make another cut at the root and rip the halves into quarters.
- Wash the cabbage well, being sure to get into the root and between the leaves.
- Sprinkle salt between the leaves by lifting up every leaf and sprinkling salt in there. Use more salt when you get closer to the stems because the leaves are thicker there. Repeat with all the remaining quarters and place them in a large bowl. Let sit for 30 minutes - 1 hour.
- In the meantime, combine the sweet rice flour with water in a small pot on medium heat. Stir continuously and once it begins to thicken shut off the heat. You want the consistency to coat the back of a spoon but still be pourable.
- While the rice mixture is cooling, rinse all the veggies and cut up the radish and carrots into matchsticks and chop the scallion and chives into 11/2 inch pieces. Place everything in a large bowl and set aside.
- To a blender, add in the fish sauce, salted shrimp, garlic, ginger, pear, and onion. Blend until smooth and pour over the chopped veggies. Add in the gochugaru and cooled rice mixture and mix until everything is evenly coated.
- By now, one hour should have passed so check on the cabbage to see if it is adequately salted. In order to check this, do a "bend test." The cabbage leaves should be malleable and bendable but still have some snap to them. Too wilted and it will become mushy as it ferments. If you bend it and it immediately snaps then the salt has not penetrated the cabbage enough. If the cabbage has not wilted enough, leave it in the salt mixture for an additional 30 minutes.
- Rinse the excess salt in running water and ring out any excess moisture. Place the cabbages back in the bowl and pour the kimchi mixture over the salted cabbage. Gently, massage the sauce in between the leaves and make sure to cover everything.
- Place the kimchi in a medium of your choice (mason jars, airtight containers, hangari, fermentation crocks, etc).Any vessel that can limit too much oxygen exposure.
- Press down the kimchi to push out any oxygen. You can also top the kimchi with fermentation weight to ensure that everything stays below the water line.
- You can enjoy some kimchi now but to get that sour fermented flavor, place the kimchi at room temperature for 3 days. Checking to make sure it's below the water line, burping it, and checking for any signs of mold every day.
- After the three days are done, place it in the fridge and enjoy! Properly fermented kimchi will last you for months but you’ll probably finish it way sooner.
Cucumber Stuffed Kimchi
Ingredients:
- 5 - 6 Persian/kirby cucumber
- 1 tablespoon of salt
- 2 cups of hot water
- ½ cup of Asian chives
- 1 Carrot
- 1 cloves of Garlic
- 2-3 tablespoons of Gochugaru
- 1.5 tablespoon of Fish sauce
- 1.5 tablespoon of honey
- Sesame seeds, optional

Instructions:
- Rinse the cucumbers under water and cut off the tips.
- In order to make the pocket where we are going to stuff the cucumber, place the cucumber on a cutting board and run a small knife through the middle, being sure to leave ½ inch uncut at one end. Roll the cucumber 90 degrees and make another lengthwise cut through the middle, being sure to leave ½ inch uncut so that the cucumber stays connected. Repeat this step with all the cucumbers. (See photo for reference.)
- Next, dissolve 1 tablespoon of salt in 2 cups of hot water and pour over the cucumbers. Set aside and let cool.
- In the meantime, chop the asian chives into 2 inch long pieces, chop the carrots into 2 inch long matchsticks, and finely mince the garlic cloves. Place everything into a bowl along with gochugaru, fish sauce, and honey.
- Drain the cucumbers from the hot water and begin filling the “pocket” with the veggie mixture. Be generous but don't overstuff it to the point where it breaks.
- Stuffed cucumber kimchi is usually cut with scissors, served with sesame seeds, and eaten the day it is made but you can also place the cucumbers into a jar or kimchi container and ferment for 1 - 3 days in a dark place on your counter. Once it's fermented, place it in the fridge and enjoy!
Radish Kimchi
Ingredients:
- 2 white radishes (around 200g)
- 1 tbsp coarse sea salt
- 1 tbsp mochiko flour
- ½ cup water
- ½ onion
- 3 cloves garlic
- ½ tbsp ginger
- 4 tbsp fish sauce
- 2 tbsp sugar
- 2 tbsp fruit juice (I used apple. You can use orange pear or green plum extract - no pineapple)
- 4 tbsp gochugaru
Instructions:
- Peel the tough outer layer of the radishes then cut into 1 inch cubes.
- Place the cubed radish into a large bowl and salt it. Mix to combine and let sit for 45 minutes, turn once at the 20 minute mark.
- In the meantime, combine the mochiko flour with water in a small pot on medium heat.
- Continuously stir and once it begins to thicken shut off the heat. You want the consistency to coat the back of a spoon but still be pourable.
- While the rice mixture is cooling, add the onion, garlic, ginger, fish sauce, sugar, and fruit juice together to a blender. Blend until smooth and set aside.
- Now it's time to assemble, discard any excess liquid from the radish.
- Pour the blended aromatics, gochugaru and cooked rice mixture over the salted radish. Using gloves mix everything together.
- You can eat some right now or you can store it in an air-tight container and ferment at room temperature for 2 - 3 days. Alternatively, you can stick it in the fridge and ferment slowly for a week. Be sure to check on the radishes for mold and burp the jar.
TOP ARTICLES

By Alex C
Senior Food Writer at Pro Home Cooks
Published
Sourdough Baking School
Master the art of sourdough bread baking in the most comprehensive baking class on the internet. This class features over three hours of baking content to help you start your sourdough journey.
See More